📚 Table of Contents
Table of Contents
Introduction
Green screen technology, or chroma keying, has transformed modern video production. It allows filmmakers, content creators, and broadcasters to transport subjects into any digital or virtual environment. From Hollywood blockbusters to live-streaming and smartphone video editing, green screen technology plays a crucial role in creating immersive visual experiences.
In this blog, we will explore the history, science, and technical workflow behind chroma keying, review top software tools, discuss cutting-edge AI-based advancements, and forecast the future of this technology.

What is Chroma Keying?
Chroma keying is a visual effects technique that replaces a specific color in a video frame—typically green—with another background. By isolating the green channel and creating a transparency map, editors can composite new visuals behind the subject.
This method is widely used in:
- Newsrooms and weather reports
- Movies and TV production
- YouTube videos
- AR/VR content creation
- Virtual meetings and streaming setups
The process involves alpha channel manipulation where the selected green background is removed, leaving the subject intact over a new virtual enviro
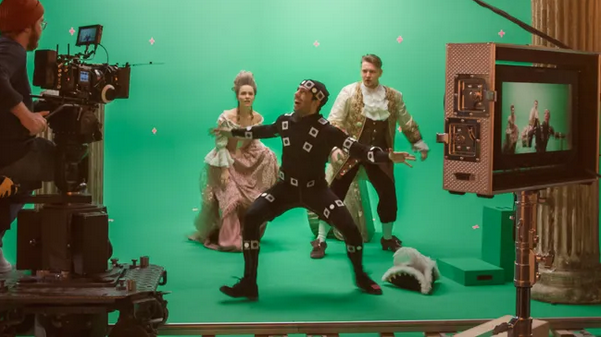
History of Green Screen background
The concept of background replacement has evolved dramatically since the early days of cinema.
- 1930s: Early visual trickery using double exposure techniques.
- 1940: Lawrence Butler used a blue screen process in The Thief of Bagdad, earning an Academy Award.
- 1950s–60s: Optical printing, traveling mattes, and sodium vapor processes.
- 1980s: Rise of digital compositing with systems like Quantel Harry.
- 2000s onwards: Software-driven chroma keying with real-time GPU processing.
The journey from optical illusions to software pipelines shows the adaptability and increasing sophistication of chroma keying over decades.
Why Green? The Scientific Explanation
Green isn’t just a random choice for background removal — it’s the scientifically optimal color for chroma keying. The decision stems from a combination of human color perception, camera sensor architecture, and digital video compression efficiency. Let’s break down why green stands out as the industry standard.
📸 4.1 CIE Color Space Analysis
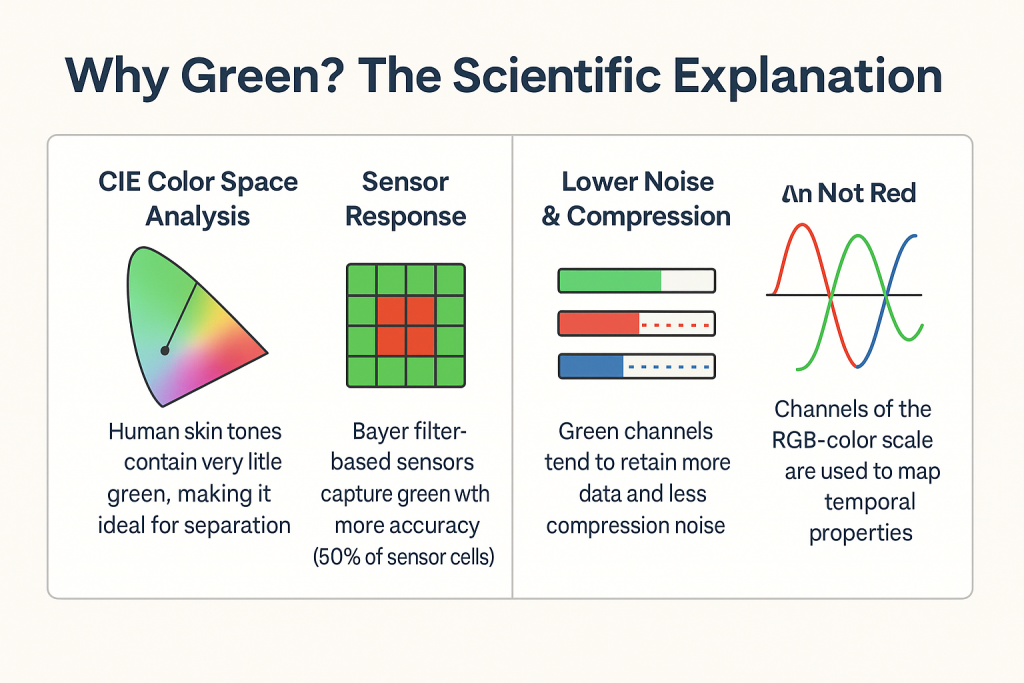
In the CIE 1931 color space, green lies farthest from the range of hues present in human skin tones, regardless of ethnicity. This makes it easier to distinguish and isolate the background from the subject without accidentally removing facial features or clothing.
✅ Skin tones are naturally rich in reds and yellows — not greens — which prevents accidental spill and allows for precise edge detection during keying.
📸 4.2 Sensor Efficiency: Bayer Filter Array
Most modern digital cameras use a Bayer filter array, where 50% of the photosites (pixels) are dedicated to capturing green light, and only 25% each for red and blue.
This gives green:
- Higher resolution in luminance information
- Greater dynamic range
- Cleaner chroma signal
This abundance of green pixel data allows for more accurate background removal, especially when working with compressed or low-light footage.
📌 Fun Fact: Green contributes most to the luma (brightness) signal in YUV color space, making it more stable across various formats and bitrates.
🔇 4.3 Noise & Compression Performance
Green channels generally produce less digital noise and are more resistant to compression artifacts compared to red or blue. In formats like H.264 and HEVC, the chroma channels (U and V) are subsampled (e.g., 4:2:0), meaning less color data is stored than brightness.
Because green dominates the brightness component, it survives these reductions more intact than other colors.
🧪 As a result, green backgrounds offer crisper edges, less color bleeding, and better results with real-time keyers in tools like OBS, Premiere Pro, or Resolve.
🚫 4.4 Why Not Blue or Red?
- 🔵 Blue was originally used in early chroma keying (e.g., The Thief of Bagdad, 1940) but often clashes with denim and dark clothing. Blue also introduces more luminance noise, especially in shadows.
- 🔴 Red closely resembles skin tones and is captured with the fewest pixels on Bayer sensors — making it the least suitable option for background removal.
🧠 4.5 Bonus Insight: RGB Channel Temporal Mapping
In some advanced compositing workflows, the RGB channels are used to map time-variant effects (e.g., heat haze, blur, or motion detection). Since green offers the cleanest signal, it becomes a stable baseline for:
- Temporal compositing
- Motion tracking
- Frame differencing
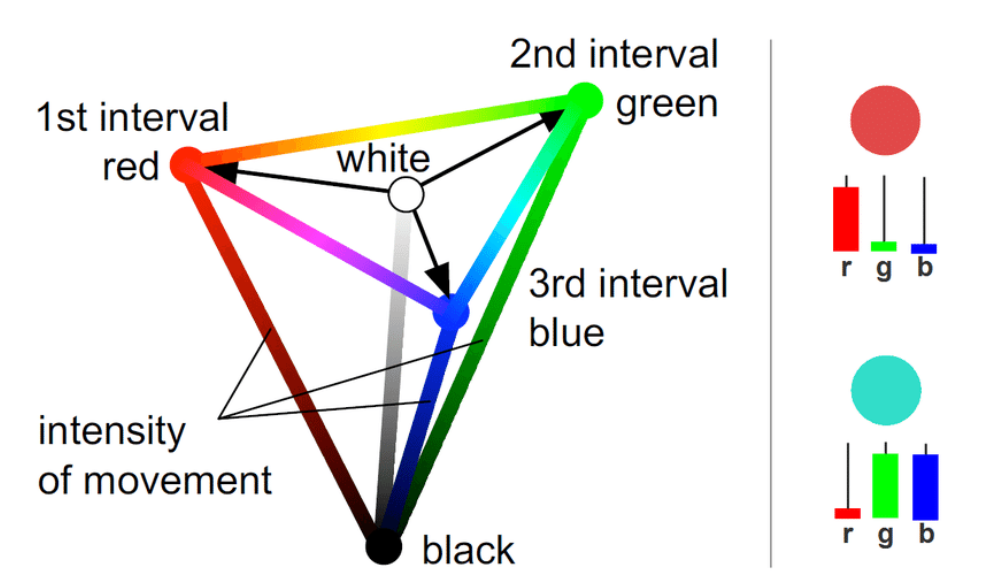
This stability gives green a unique advantage in multi-frame processing, used in machine learning and virtual production environments.
✅ Summary
| Factor | Green Advantage |
|---|---|
| Color Separation | Distant from skin tones |
| Sensor Priority | Captured at 50% in Bayer filter |
| Noise Level | Minimal, even in low light |
| Compression | Survives subsampling better |
| Visual Tracking | Stable for frame-based effects |
From its physical properties to digital compatibility, green remains the most efficient and accurate choice for chroma key workflows — whether you’re producing YouTube shorts or blockbuster VFX.
How Chroma Keying Works (Technical Deep Dive)
Chroma keying may seem magic, but it’s based on systematic, color-based image processing steps. This deep dive explores how green-screen footage is transformed into a staged composite using precise algorithms.
5.1. RGB Thresholding and Mask Creation
The process begins by analyzing each pixel’s red, green, and blue (RGB) values. Chroma key software sets a threshold to detect “green dominance” — typically when the green value (G) significantly exceeds red and blue channels. Pixels meeting this criterion are flagged as background and used to generate a binary mask.
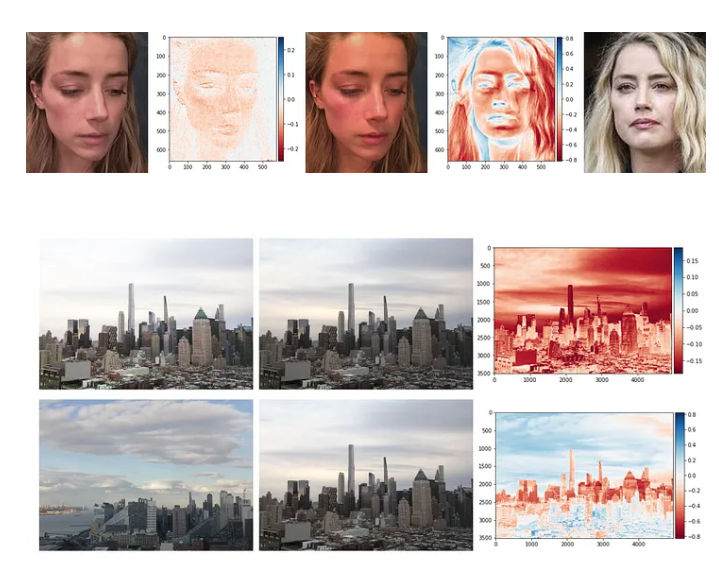
This mask serves as a blueprint: white for foreground (keep) and black for background (remove). You create it by comparing pixel values to threshold boundaries, a method termed color thresholding. It’s commonly implemented using RGB or HSV color models for greater precision
5.2 Alpha Matte Generation
Once the mask is ready, the next step is converting it into an alpha matte, introducing varying transparency levels to create more nuanced edges. The alpha channel ranges from 0 (fully transparent) to 1 (fully opaque). This concept is fundamental in digital compositing, aided by tools like After Effects, which let you view and refine alpha components .
With the alpha map applied, background pixels become transparent, enabling you to overlay any scene behind the subject seamlessly.
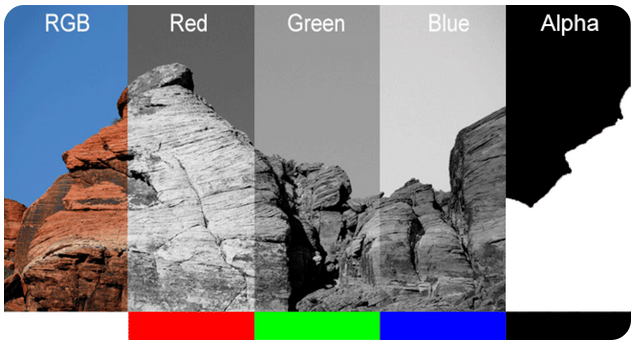
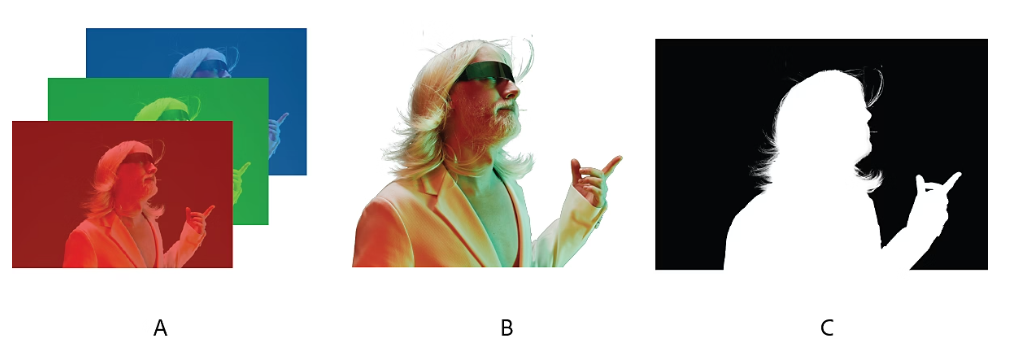
B. Alpha channel represented as a grayscale image
C. Composite using all four channels with a background showing through transparent areas
5.3 Spill Suppression & Edge Blending
- Even with a clean mask, green light often “spills” onto the subject—especially around hair or reflective surfaces. To correct this, spill suppression algorithms neutralize green tints, ensuring accurate color representation.
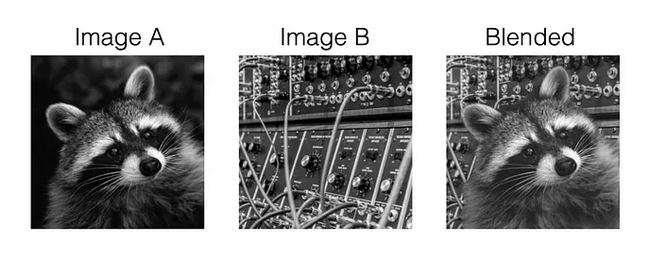
- To make edges seamless, editors use Laplacian pyramid blending, a multiresolution technique that merges foreground and background at different spatial frequencies. This ensures crisp edges without ghosting or halos
5.4 Compositing Pipeline
After clean edges are achieved, the software renders the final composited video by:
- Placing foreground with the matte on top.
- Laying the background scene beneath.
- Applying color correction to harmonize both layers.
- Adjusting depth of field and motion blur to match camera movement.
This over operator follows the formula:
FinalColor = alpha * Foreground + (1 – alpha) * Background
The result: seamless integration where the subject appears naturally within the inserted background.
5.5 Optional: Vlahos Algorithm
- Named after Petro Vlahos, the Vlahos algorithm enhances classic chroma keying by analyzing RGB differences and applying 3-dimensional color weighting. Unlike simple thresholding, this method adapts to uneven lighting and varying shades of green, improving matte accuracy github.com+3ruor.uottawa.ca+3ruor.uottawa.ca+3.
- It evolves the matte generation to be both flexible and resilient, especially for visual effects in dynamic or imperfect studio conditions.
✅ Summary
- Thresholding: identifies green pixels and generates a binary mask.
- Alpha Matte: creates smooth transparency levels.
- Spill Suppression: removes unwanted green hues.
- Pyramid Blending: refines edges for natural merging.
- Compositing Pipeline: overlays and fine-tunes the final scene.
- Vlahos Algorithm: adds robustness for imperfect lighting.
Combined, these techniques form a powerful toolkit for professional chroma keying—enabling creators to produce cinema-level composites with ease.
Software Tools for Chroma Keying in green screen technology
Here are reliable tools supporting chroma keying, with direct links:
| Software | Link | Description |
|---|---|---|
| Adobe Premiere Pro | Link | Industry standard NLE with ultra-key filter. |
| Final Cut Pro | Link | Mac-based editor with built-in chroma tools. |
| DaVinci Resolve | Link | Professional grading and node-based chroma. |
| OBS Studio | Link | Live streaming and real-time chroma keying. |
| Camtasia | Link | Screen recording and light editing with chroma. |
| CapCut | Link | Mobile editor supporting green screen overlays. |
| Kinemaster | Link | Mobile-based editor with chroma layering support. |
| Edius Pro | Link | known for its high-speed real-time editing, support for various formats, and user-friendly interface |
How to Use Green Screen in Top Video Editing Software: Step-by-Step Guide for popular tools:
Once you’ve recorded your footage in front of a green screen, the next step is to replace that green background with any virtual or real-world scene using video editing software. Below is a detailed guide on how to do this across various popular tools — from desktop professional editors to mobile-friendly apps.
🖥️ 6.1 Adobe Premiere Pro
Steps:
- Open Adobe Premiere Pro and create a new project.
- Import your green screen footage and the background you want to use.
- Drag the green screen clip to the timeline above the background.
- Go to the “Effects” panel, search for “Ultra Key” and drag it to the green screen clip.
- Go to the Effect Controls panel and use the eyedropper to click on the green background in the video.
- Adjust Matte Generation, Spill Suppression, and Color Correction until the subject blends naturally.
- Export your final video.
🍏 6.2 Final Cut Pro (macOS only)
Steps:
- Launch Final Cut Pro and create a new project.
- Import your green screen video and background image or footage.
- Drag the background to the bottom layer and green screen video above it.
- Go to the Effects Browser, search for “Keyer”, and drag it onto your green screen clip.
- Final Cut Pro automatically removes the green background.
- Use Matte Tools to refine edges, and adjust spill suppression and color correction.
- Preview and export the video.
🎨 6.3 DaVinci Resolve
Steps:
- Open a new or existing project in Resolve.
- Import green screen footage and background image/video.
- Go to the Edit tab and place both clips on the timeline.
- Switch to the Color tab.
- Use the Qualifier tool to pick the green color on the preview window.
- Right-click and add Alpha Output, then connect the blue alpha square from the node.
- Refine edges with Matte Finesse settings.
- Return to the Edit tab and export your video.
📡 6.4 OBS Studio (Live or Recording)
Steps:
- Open OBS and add your camera or media file as a Source.
- Right-click the source and choose Filters.
- Click the + sign and select Chroma Key.
- OBS will auto-pick green as the key color. Adjust similarity and smoothness sliders as needed.
- Add your background as another source layer below.
- Record or livestream your chroma-keyed scene.
🎥 6.5 Camtasia
Steps:
- Launch Camtasia and import your green screen and background footage.
- Drag the background to the first track and the green screen video to the second.
- Select the green screen clip and open the Visual Effects panel.
- Drag the Remove a Color effect to the clip.
- Use the Eyedropper tool to select the green background.
- Tweak Tolerance, Softness, and Hue to clean up edges.
- Export the project when satisfied.
📱 6.6 CapCut (Mobile/Desktop)
Steps:
- Open CapCut and create a new project.
- Add your background video first, then overlay the green screen clip.
- Tap on the green screen layer and select Chroma Key.
- Use the Color Picker to target the green background.
- Adjust Strength, Shadow, and Edge options as needed.
- Export your video.
📲 6.7 Kinemaster (Mobile)
Steps:
- Open Kinemaster and start a new project.
- Add your background to the main track.
- Add the green screen video as a Layer.
- Tap the layer and enable Chroma Key from the right-side menu.
- Choose green as the key color, and adjust Edge Feather and Show Mask options.
- Export when satisfied.
🧩 6.8 Edius Pro by Grass Valley
Steps:
- Open Edius and create a new project.
- Import your green screen and background clips.
- Drag the background to Video Track 1 and green screen footage to Video Track 2.
- Select the green screen clip → go to the Effect Palette.
- Apply the Chrominance Key effect under Keyers.
- Use the color picker to select green in the preview monitor.
- Adjust the Key Level, Softness, and Transparency settings to clean up the key.
- Use the Mask Filter if required for additional fine-tuning.
- Preview and export the final video.
✅ Final Thoughts-
Whether you’re editing YouTube shorts, corporate videos, or cinematic scenes, chroma keying is now easier and more powerful than ever. From Edius and Premiere to mobile-friendly apps like CapCut and Kinemaster, green screen editing is accessible to all skill levels. Simply shoot in a well-lit green background and choose the software that fits your workflow best.
💡 Pro Tip: Always use soft, diffused lighting and avoid green elements in your wardrobe or props!
Advanced Techniques & Machine Learning Approaches
As green screen technology matures, video production has entered a new era powered by artificial intelligence and machine learning. Traditional chroma keying depended heavily on controlled lighting, uniform color saturation, and post-processing expertise. However, modern AI-driven techniques can now intelligently segment foreground from background—even without the need for a physical green screen. These innovations are reshaping the landscape of virtual production, content creation, and real-time broadcasting.
Machine learning models trained on vast datasets can accurately detect human subjects, isolate fine edges like hair or translucent fabric, and even handle motion blur and dynamic lighting conditions. These advancements not only improve compositing accuracy but also streamline workflows for creators, reducing both editing time and hardware demands. The following subsections explore some of the most powerful AI architectures and compositing pipelines now shaping the future of chroma keying.
7.1 MODNet and U²-Net Architectures in green screen technology
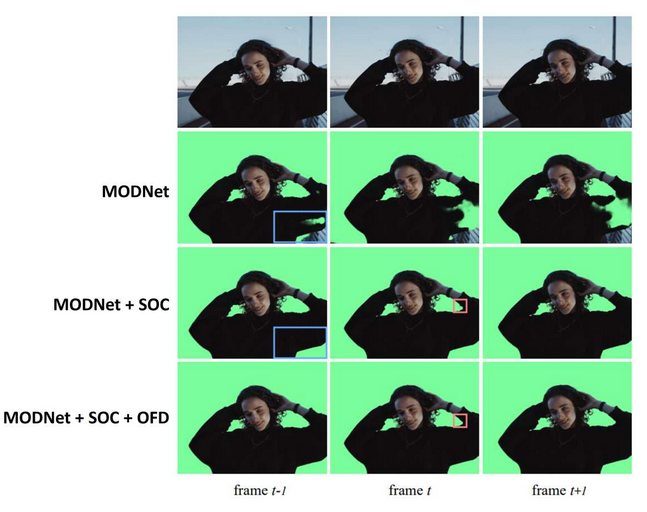
Modern AI segmentation tools like MODNet and U²-Net provide person segmentation using deep learning, eliminating green screens entirely.
7.2 OpenEXR Deep Compositing
Pixar’s OpenEXR format allows per-pixel depth values, enabling seamless compositing with depth-aware shadows and transparency.
7.3 NeRF (Neural Radiance Fields)
Using NeRFs, background and subject geometry are learned for 3D scene integration without traditional chroma keys.
Role in Virtual Production Studios
Green screen technology plays a pivotal role in LED volume and virtual studio production environments. With the help of real-time engines like Unreal Engine, chroma keying facilitates:
- Dynamic scene changes
- On-the-fly camera tracking
- Seamless actor integration into 3D environments
Major studios like Disney and Netflix use green screen alongside volumetric LED walls for flexibility in complex visual narratives.
Integration with Augmented and Mixed Reality
AR and MR applications are benefiting from chroma techniques. Green screen allows for:
- Real-time hologram overlays
- Interactive journalism and education
- Mixed-reality stage events
Software like Reality Composer and Spark AR use chroma masking to isolate subjects and augment visuals dynamically on mobile and headset platforms.
Accessibility and Mobile Innovations
Modern smartphones and tablets now support green screen removal natively:
- Apple’s iMovie and Clips app support basic chroma tools
- Android apps like PowerDirector and VLLO offer tap-based green screen editing
This democratization makes professional visual effects available to:
- Independent creators
- Educational projects
- Remote reporters and influencers
Ethical and Legal Considerations
With great creative power comes responsibility. Green screen manipulation raises important concerns:
- Misinformation: Fabricated backgrounds may mislead viewers
- Consent and Licensing: Using third-party backgrounds without rights may result in legal issues
- Deepfake Crossover: Chroma tools combined with AI-generated faces can create hyperreal fakes
Ethical content creation guidelines are being advocated by global organizations to maintain trust and credibility in digital media.
Case Studies from Media and Broadcast
Green screen technology has been widely adopted across various sectors — from weather broadcasting to cinematic universes, and even educational content platforms. The following case studies illustrate how organizations are using chroma keying to drive creativity, efficiency, and viewer engagement at scale.
🌦️ BBC Weather Studio: Real-Time Interaction with Data
The BBC has long been a pioneer in leveraging green screen for weather forecasting. In their studios, meteorologists don’t simply stand in front of static images — they interact with 3D-generated maps and animated elements rendered in real-time.
Using advanced green screen environments and graphics engines like Vizrt and Unreal Engine, BBC weather presenters walk around virtual maps and point to dynamically updated data like rainfall predictions or temperature changes. The result is a highly engaging and informative viewer experience that goes far beyond the traditional 2D forecast.
🔗 Learn how BBC blends chroma and real-time rendering (BBC R&D)
🎬 Marvel Studios: Cinematic Worlds Built with Chroma Key
In the world of blockbuster cinema, Marvel Studios represents one of the most prolific users of chroma key technology. Entire cities, intergalactic backdrops, and fantastical settings are generated digitally, while actors perform in front of green screens on motion capture stages.
Behind the scenes of movies like Avengers: Endgame or Doctor Strange in the Multiverse of Madness, actors are filmed with minimal practical sets. The digital environments, from flying battlefields to magical dimensions, are added in post-production using a combination of green screen plates, VFX layering, and 3D modeling.
🔗 Explore Marvel’s green screen process (Insider Video)
🔗 Behind Marvel’s visual effects (Wired)These examples showcase green screen’s adaptability across formats and goals.
Green Screen Lighting Techniques
Lighting is a critical element in achieving clean chroma key results. Proper lighting eliminates color spill, shadows, and uneven tones.
- Even Lighting: Use softbox lights or LED panels to ensure uniform brightness across the green background.
- Backlighting the Subject: Helps create separation from the screen.
- No Shadows: Maintain distance between the subject and screen to avoid casting shadows.
- White Balance: Match camera settings to lighting conditions to prevent unwanted color shifts.
Balanced lighting ensures a seamless key and reduces post-processing time.
DIY Green Screen Setups
Creating your own green screen at home or in a small studio is highly feasible and budget-friendly.
Materials:
- Green cotton or polyester fabric
- Non-reflective green paint on walls or boards
- Pop-up green screen frames or collapsible panels
Tips:
- Use wrinkle-free fabric
- Keep the screen taut and smooth
- Ensure even lighting and a flat surface
Affordable options like Elgato or Neewer green screens cater to hobbyists and remote workers.
Best Practices for Post-Production Keying
Even with well-lit green screen footage, the magic of chroma keying is truly realized during post-production. It’s here that attention to detail and precision editing transform raw shots into polished, professional video content. Below are key post-processing practices to ensure your green screen compositions are seamless and cinematic.
🎨 15.1 Color Grading: Harmonizing Subject and Background
One of the most common issues with green screen composites is visual mismatch between the subject and the background. Color grading bridges this gap. Adjust exposure, white balance, and shadows/highlights of your subject to match the tone and ambiance of the virtual scene.
For instance, if the background is a sunset, your foreground should reflect warmer tones with appropriate shadow gradients. Tools like Lumetri Color Panel in Adobe Premiere Pro or Color Wheels in DaVinci Resolve help achieve this easily.
✂️15.2 Edge Refinement: Feathering for Natural Transitions
Chroma key edges often appear too sharp, especially around hair, fingers, or fabric fringes. This is where edge feathering and soft masking come into play. Applying a subtle blur or feather around the alpha matte improves natural blending.
In After Effects, the Refine Edge Tool and Advanced Spill Suppressor work effectively. In Final Cut Pro, you can adjust Edge Distance and Soften settings inside the Keyer effect.
🌀 15.3 Motion Blur Matching: Syncing Movement Realism
If your green screen subject moves quickly, there will be motion blur. Your background must replicate that blur pattern and direction to avoid unnatural contrast. Most video editors offer motion blur simulation tools or allow frame blending.
Matching the subject’s blur curve with that of the virtual camera movement ensures consistency and realism in action scenes. DaVinci Resolve’s Motion Effects and After Effects’ Pixel Motion Blur are great tools for this.
🔇 15.4 Noise Reduction: Cleaning Up Visual Artifacts
Low-light or budget cameras often introduce digital noise, especially in the green channel. This noise becomes highly visible once the background is removed. To address this, apply temporal or spatial noise reduction filters before keying.
Neat Video, Resolve’s Temporal NR, and Adobe’s Reduce Grain are widely used plugins that maintain visual quality while cleaning artifacts, ensuring smoother keys.
🧰 15.5 Recommended Plugins: Going Beyond Native Tools
For those seeking more precision and automation, third-party plugins offer robust solutions:
- 🎞️ Red Giant Keying Suite – Includes Primatte Keyer and Warp tools for edge correction and light wrapping.
🔗 Official Site - 🔍 Boris FX Primatte Studio – Offers advanced spill suppression, garbage matte support, and chroma tools for professional broadcast.
🔗 Official Site
These plugins integrate seamlessly into After Effects, Premiere Pro, and Resolve, offering finer control over difficult green screen elements.
Future Innovations in Virtual Backgrounds
- Quantum Dot Displays: Ultra-precise color emission for physical screens.
- Femtosecond Photon Imaging: Real-time depth mapping using laser pulses.
- USD (Universal Scene Description): Used in virtual sets and VFX pipelines.
- Zero Green Solutions: AI-only segmentation methods that require no chroma background.
- Holographic Light Fields: Record volumetric light data to eliminate need for post-processing.
“In the future, green screens may disappear, but chroma keying as a technique will remain foundational.” — Dr. Markus Gross, ETH Zurich
Conclusion
From vintage film studios to mobile apps powered by AI, green screen technology has evolved into a cornerstone of modern media. Its integration into virtual production, mobile journalism, and immersive education proves its adaptability and staying power.
With emerging breakthroughs in deep learning, optics, and spatial computing, the chroma key principle may become invisible—but never irrelevant. As creators, understanding its past, mastering its present, and envisioning its future is key to leveraging its full potential.
Automate it. Master it. Green Screen is more than a background—it’s the future of video production
— Navneet Tiwari


